终端节点的创建
所谓终端节点就是用来通信的端对端的节点,可以通过ip地址和端口构造,其的节点可以连接这个终端节点做通信
如果是客户端,可以通过对端的ip和端口构造一个endpoint对象
1
2
3
4
5
6
7
8
9
10
11
12
13
14
15
16
17
18
19
20
21
22
23
24
25
| int client_endpoint() {
std::string raw_ip_address = "127.0.0.1";
unsigned short port_num = 8080;
boost::system::error_code error;
boost::asio::ip::address ip_address =
boost::asio::ip::address::from_string( raw_ip_address, error );
if (error.value() != 0) {
std::cout << "Failed to parse IP address. Error code is: "
<< error.value() << ", Message: "
<< error.message() << std::endl;
return error.value();
}
boost::asio::ip::tcp::endpoint ep( ip_address, port_num );
return 0;
}
|
如果是服务端,则只需要本地地址绑定就可以生成endpoint
1
2
3
4
5
6
7
8
9
10
11
12
| int server_endpoint() {
unsigned short port_num = 8080;
boost::asio::ip::address ip_address = boost::asio::ip::address_v4::any();
boost::asio::ip::tcp::endpoint ep(ip_address, port_num);
return 0;
}
|
创建socket
- 创建上下文
io_context
- 选择协议
- 生成
socket
- 打开
socket
1
2
3
4
5
6
7
8
9
10
11
12
13
14
15
16
17
18
19
20
21
22
| int create_tcp_socket() {
using boost::asio::ip::tcp;
boost::asio::io_context ios;
tcp protocol = tcp::v4();
tcp::socket sock( ios,
protocol );
boost::system::error_code ec;
sock.open( protocol, ec );
if ( ec.value() != 0 ) {
std::cout << "Failed to open the socket! Error code: " << ec.value()
<< " Message: " << ec.message() << std::endl;
return ec.value();
}
return 0;
}
|
上面的socket只是通信的socket,如果是服务端,我们还需要生成一个acceptor的socket,用来接受新的连接
1
2
3
4
5
6
7
8
9
10
11
12
13
14
15
16
17
18
19
20
21
22
23
| int create_acceptor_socket() {
using boost::asio::ip::tcp;
boost::asio::io_context ios;
tcp protocol = tcp::v6();
tcp::acceptor acceptor(
ios );
boost::system::error_code ec;
acceptor.open( protocol, ec );
if ( ec.value() != 0 ) {
std::cout << "Failed to open the socket! Error code: " << ec.value()
<< " Message: " << ec.message() << std::endl;
return ec.value();
}
return 0;
}
|
绑定acceptor
对于acceptor类型的socket,服务器需要将其绑定到指定的断点,所有连接这个端点的连接都可以被接收到
1
2
3
4
5
6
7
8
9
10
11
12
13
14
15
16
17
18
19
20
21
22
23
24
25
26
27
28
29
30
31
| int bind_acceptor_socket() {
using boost::asio::ip::tcp;
unsigned short port_num = 8080;
tcp::endpoint endpoint( boost::asio::ip::address_v4::any(),
port_num );
boost::asio::io_context ios;
tcp::acceptor acceptor( ios,
endpoint );
boost::system::error_code ec;
acceptor.bind( endpoint, ec );
if ( ec.value() != 0 ) {
std::cout << "Failed to bind the socket! Error code: " << ec.value()
<< " Message: " << ec.message() << std::endl;
return ec.value();
}
return 0;
}
|
连接指定的端点
作为客户端可以连接服务器指定的端点进行连接
1
2
3
4
5
6
7
8
9
10
11
12
13
14
15
16
17
18
19
20
21
22
23
24
25
26
27
28
29
| int connect_to_endpoint() {
std::string raw_ip_address = "127.0.0.1";
unsigned short port_num = 8080;
using boost::asio::ip::tcp;
try {
tcp::endpoint endpoint(boost::asio::ip::address::from_string(raw_ip_address), port_num);
boost::asio::io_context ios;
tcp::socket soc(ios, endpoint.protocol());
soc.connect(endpoint);
} catch (std::exception &e) {
std::cerr << e.what() << std::endl;
return -1;
}
return error.value();
}
|
服务器接收连接
当有客户端连接时,服务器需要接收连接
1
2
3
4
5
6
7
8
9
10
11
12
13
14
15
16
17
18
19
20
21
22
23
24
25
26
27
28
29
30
31
32
33
34
35
36
| int accept_new_connection() {
unsigned short port_num = 8080;
using boost::asio::ip::
tcp;
tcp::endpoint endpoint( boost::asio::ip::address_v4::any(),
port_num );
boost::asio::io_context ios;
try {
tcp::acceptor acceptor( ios,
endpoint.protocol() );
acceptor.listen( BACKLOG );
tcp::socket socket( ios, endpoint.protocol() );
acceptor.accept( socket );
} catch ( std::exception &e ) {
std::cerr << e.what() << std::endl;
return -1;
}
return 0;
}
|
buffer
buffer就是用来接收和发送数据时缓存数据的接口
boost::asio提供了asio::mutable_buffer和asio::const_buffer两种类型的buffer,他们是一段连续的空间,首字节存储了后续数据的长度。asio::mutable_buffer用于写服务,asio::const_buffer用于读服务。但是着这两个结构都没有被asio的api直接使用
对于api的buffer参数,asio提出了MutableBufferSequence和ConstBufferSequence两种类型的buffer参数,他们是由多个asio::mutable_buffer和多个asio::const_buffer组成的容器。MutableBufferSequence和ConstBufferSequence的具体类型是boost::asio::mutable_buffer和boost::asio::const_buffer。也就是说boost::asio为了节省空间,将一部分连续空间组合起来,交给api使用。可以理解为MutableBufferSequence的数据结构为std::vector<boost::asio::mutable_buffer>,ConstBufferSequence的数据结构为std::vector<boost::asio::const_buffer>
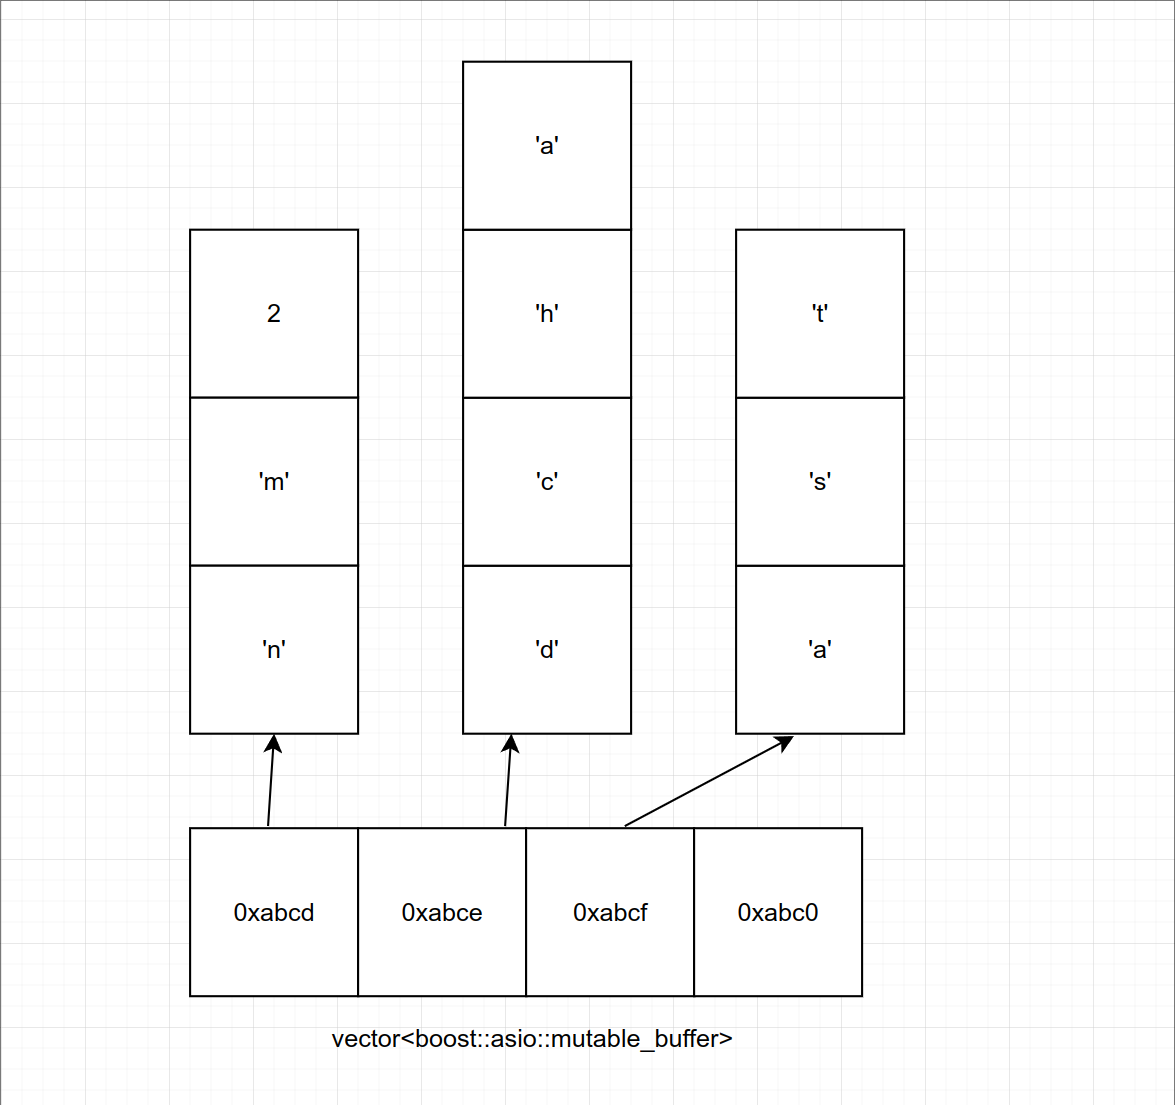
std::vector<boost::asio::mutable_buffer>的结构如下

每个vector存储的都是mutable_buffer的地址,每个mutable_buffer的第一个字节表示数据的长度,后面跟着数据内容。
这么复杂的结构交给用户使用并不合适,所以asio提出了buffer()函数,该函数接收多种形式的字节流,该函数返回asio::mutable_buffers_1或者asio::const_buffers_1结构的对象。
如果传递给buffer()的参数是一个只读类型,则函数返回asio::const_buffers_1 类型对象。
如果传递给buffer()的参数是一个可写类型,则返回asio::mutable_buffers_1 类型对象。
asio::const_buffers_1和asio::mutable_buffers_1是asio::mutable_buffer和asio::const_buffer的适配器,提供了符合MutableBufferSequence和ConstBufferSequence概念的接口,所以他们可以作为boost::asio的api函数的参数使用。
总的来说,我们可以用buffer()函数来生成我们要使用的缓存存储数据
比如boost的发送接口send要求的参数为ConstBufferSequence类型
1
2
| template<typename ConstBufferSequence>
std::size_t send(const ConstBufferSequence &buffers);
|
将”Hello World”转换成这种类型
1
2
3
4
5
6
| void use_const_buffer() {
std::string buf = "Hello World";
boost::asio::const_buffer asio_buf(buf.c_str(), buf.length());
std::vector<boost::asio::const_buffer> buffers;
buffers.push_back(asio_buf);
}
|
现在buffers就是可以传递给接口send的类型,但是这样太复杂了,可以直接使用buffer函数转为为send所需要的类型
1
2
3
| void use_buffer_str() {
asio::const_buffer asio_buf("Hello World");
}
|
asio_buf可以直接传递给send接口。也可以将数组转化为send接受的类型
1
2
3
4
5
| void use_buffer_array() {
const size_t BUF_SIZE = 20;
std::unique_ptr<char[]> buf(new char[BUF_SIZE]);
auto input_buf = boost::asio::buffer(static_cast<void*>(buf.get()), BUF_SIZE);
}
|
对于流式操作,可以用streambuf,将输入输出流和streambuf组合起来,可以实现流式输入和输出
1
2
3
4
5
6
7
8
9
10
11
12
13
14
15
16
17
18
19
20
21
22
| void use_stream_buffer() {
asio::streambuf buf;
std::ostream output(&buf);
output << "Message1\n";
output << "Message2";
std::istream input(&buf);
std::string message1;
std::getline(input, message1);
}
|